For some car owners, it’s easy for them to find an ideal car radio for their cars. However, what bothers them is the installation which is thought to be quite difficult. Actually, it’s not too hard to install a new car radio since most car radios are just plug and play. And a correct installation guide can be instructive. If you own a 1998-2005 Mercedes Benz S Class W220, you can follow the following 1998-2005 Mercedes Benz S Class W220 car radio installation guide from Seicane.

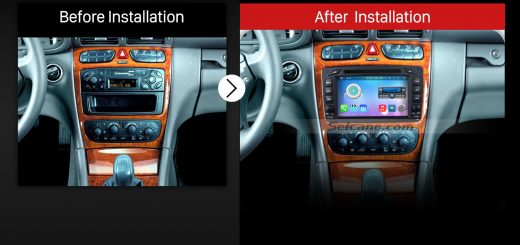
1998-2005 Mercedes Benz S Class W220 car radio after installation
Precautions of the installation:
- Please apply the parking brake and remove the negative cable on the vehicle battery before the removal to ensure safety.
- A lever and a screwdriver need to be prepared before the installation.
- For your convenience, here’s the recommended tools for removal and installation from Seicane, please check for more details: http://www.seicane.com/car-dvd-dismantling-device-srd-400
1998-2005 Mercedes Benz S Class W220 car radio installation guide
1.The original car radio.

The original CD player
2 Set the parking brake and shift to a lower gear to allow the brake disc to open up.

2-1. Set the parking brake and shift to a lower gear to allow the brake disc to open up

2-2. Set the parking brake and shift to a lower gear to allow the brake disc to open up
3.Remove one screw on the right of the brake disc. Then remove the other screw on the left in the same way. After that, pull out the brake disc.

3-1.Remove one screw on the right of the brake disc. Then remove the other screw on the left in the same way. After that, pull out the brake disc

3-2.Remove one screw on the right of the brake disc. Then remove the other screw on the left in the same way. After that, pull out the brake disc
4.Pry the edges of the panel along the sides with a lever, and remove the panel.

4-1. Pry the edges of the panel along the sides with a lever, and remove the panel.

4-2. Pry the edges of the panel along the sides with a lever, and remove the panel.
5.Remove four screws holding the original radio in the dashboard with a screwdriver.

Remove four screws holding the original radio in the dashboard with a screwdriver
6.Take the original radio out of the dashboard.

Take the original radio out of the dashboard
7.Disconnect the connector at the back of the original radio.

Disconnect the connector at the back of the original radio
8.Check all the accessories for the new Seicane car radio.

Check all the accessories for the new Seicane unit
9.Connect the harnesses to the back of the new Seicane car radio.

Connect the harnesses to the back of the new Seicane unit
10.Connect the Seicane car radio to your original car radio ‘s plugs, and turn on the new Seicane car radio to carefully check if everything works well.
11.Put the new Seicane car radio back into the dashboard.
12.Install all screws and the panel into their original place. And put back the brake disc.
That’s all the installation instruction for a 1998-2005 Mercedes Benz S Class W220 car radio. If you have any question, you are able to seek help from your dealer. If you can’s install it your own, you can ask a professional for help. On the other hand, if you are still looking for a suitable car radio, I’d like to recommend a wonderful 1998-2005 Mercedes Benz S Class W220 car radio from Seicane to you. Here’s the link, please click:
This in dash aftermarket Mercedes Benz S Class W220 car radio can be combined with Mercedes Benz S Class from 1998 to 2005 at present. With the turn-by-turn direction and voice prompts, you won’t have any difficulty in finding the way to your destination. By utilizing the bluetooth technology to pair with your enabled mobile phone, you can stay focused on the road ahead and keep your hands on the steering wheel to make and receive phone calls to ensure safety, besides, audio streaming can be available in this way to relax on the way. Just take it right now and have a wonderful time with it. Good luck to you!
Does this new Seican radio also work with D2B fiber optic ring as found in a 1998 S500?
Hello, you need send us plugs to check ? please visit seicane.com
Thank you. I have traded the S500 for a 1997 GMC Savana.