Want to upgrade your DVD player Radio? Have trouble with how to remove it? Have trouble with how to install it? Here is the most useful and easy to learn ways for you to deal with your 2010-2013 Nissan March aftermarket radio gps head unit from Seicane. Just in several steps can you finish the replacement of your car radio. Now please pay attention to read the following steps which is useful for all of the Nissan March owners.

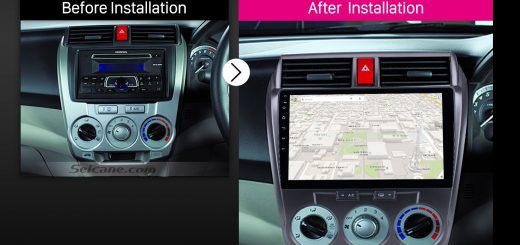
2010-2013 Nissan March aftermarket radio gps head unit after installation
Precautions for this installation:
1.Before you start up any work, park your car well and unplug the negative power cable to avoid any danger.
2.Please make sure that all fastened wires are isolated with electrical tape.
3.Please make sure the ignition is off to avoid short circuit.
4.For your convenience, here’s the recommended tools for removal and installation from Seicane, please check for more details: http://www.seicane.com/car-dvd-dismantling-device-srd-400
2010-2013 Nissan March DVD player radio installation instruction
1. Remove the panel by using the lever.

Remove the panel by using the lever
2. Unplug the connecter from the dashboard.

Unplug the connecter from the dashboard
3. Unscrew the four screws holding the original car radio.

Unscrew the four screws holding the original car radio
4. Take out the car radio and disconnect the wire harness at the back of the unit.

4-1. Take out the car radio and disconnect the wire harness at the back of the unit

4-2
5. Remove the bracket by unscrew the screws.

Remove the bracket by unscrew the screws
6. Check all the accessories for the new Seicane car radio.
7. Connect the harnesses to the back of the new Seicane car radio.
8. Connect the Seicane car radio to your original car radio ‘s plugs.
9. Turn on the new Seicane radio to have a careful check if everything works well. If it doesn’t, please check whether all the cables are connected correctly.
10. Put the new Seicane radio into the dash.
11. Put everything into their original place. All the installation is done.
That’s all about how to remove and install 2010-2013 Nissan March aftermarket radio gps head unit. For a newbie, if you want to repair your radio, you’d better ask someone professional to do it. If you want to know about new DVD player radio, here is the best choice for you from Seicane:
With the useful Bluetooth, you can avoid danger during your trip while you answer your phone or listen to music. The rearview camera also bring you a safe trip. Enjoy your leisure time with powerful Android 5.1.1 and HD 1024*600 touch Screen OBD2.

Recent Comments