To get to an unfamiliar location, it may be hard for most car owners if they don’t have any guidance. In that case, a GPS navigation system can be much helpful. If your factory radio can’t support GPS function, one of the great ways is to replace it with an aftermarket car stereo. It’s quite easy to install a new one. If you own a Mercedes-Benz SLK W171 R171, you can take this Mercedes-Benz SLK W171 R171 car radio from Seicane as a reference during the whole process of the installation.

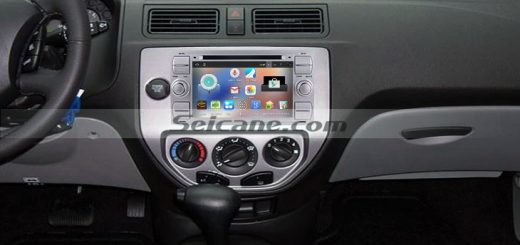
Mercedes-Benz SLK W171 R171 head unit after installation
Some tips before the installation:
1.Please disconnect the power before the installation.
2.Please prepare a lever and a screwdriver before the removal and the installation.
3.Please keep all the separate parts from the car. Please take great care of the dashboard to avoid scratching it during its detachment and installation. Please keep handy any parts from the car and make use of all the original screws from the car as much as possible. so each related part of the unit can be fixed securely.
4.For your convenience, here’s the recommended tools for removal and installation from Seicane, please check for more details: http://www.seicane.com/car-dvd-dismantling-device-srd-400
Mercedes-Benz SLK W171 R171 head unit installation guide
1. Open the little box beneath the radio and remove the screws with a screwdriver.

Open the little box beneath the radio and remove the screws with a screwdriver
2. Pry the trim panel on the right side of the box with a removal tool, after that, remove it.

Pry the trim panel on the right side of the box with a removal tool, after that, remove it
3. Remove the screw with a screwdriver.

Remove the screw with a screwdriver
4. Pry the leather surrounding the brake, then pull it up, at last, remove it.

Pry the leather surrounding the brake, then pull it up, at last, remove it
5. Remove the trim panel under the brake with your hands.

Remove the trim panel under the brake with your hands
6. Disconnect the connectors behind the trim.

Disconnect the connectors behind the trim
7. Take the box out of the dashboard.

Take the box out of the dashboard
8. Disconnect the connectors behind the box.

Disconnect the connectors behind the box
9. Remove the trim panel on the box with your hands.

Remove the trim panel on the box with your hands
10.Disconnect the connectors at the back of the trim panel.

Disconnect the connectors at the back of the trim panel
11. Remove two screwdrivers inside the trim panel.

Remove two screwdrivers inside the trim panel
12.Take another box under the radio with your hands.

Take another box under the radio with your hands
13. Disconnect all the connectors at the back of the box.

Disconnect all the connectors at the back of the box
14. Remove two screws after taking away the box with a screwdriver.

Remove two screws after taking away the box with a screwdriver
15. Pop out the disc player.

Pop out the disc player
16. Remove the screws at both sides of the disc player.

Remove the screws at both sides of the disc player
17. Take the disc player out of the dashboard.

Take the disc player out of the dashboard
18. Remove two screws holding the radio with a screwdriver.

Remove two screws holding the radio with a screwdriver
19. Take the radio out of the dashboard.

Take the radio out of the dashboard
20. Disconnect all the connectors at the back of the radio.

Disconnect all the connectors at the back of the radio
21. Check all the accessories for the new Seicane head unit.

Check all the accessories for the new Seicane head unit
22. Connect the harnesses to the back of the new Seicane head unit.

Connect the harnesses to the back of the new Seicane head unit
23. Connect the Seicane head unit to your original car radio ‘s plugs.
24. Put the new Seicane unit into the dashboard and turn it on to have a comprehensive check.
25. If everything works well, then install all the screws, boxes and trim panels accordingly into their original places. If not, check carefully whether all the cables are connected or not.
Is it easy for you to understand all the installation steps for a Mercedes-Benz SLK W171 R171 car radio in particular? If not, it’s suggested you consult your dealer. Or you can also directly have a professional install it. If you haven’t found an ideal head unit for your car, you can refer to this multifunctional Mercedes-Benz SLK W171 R171 car radio from Seicane. It comes with the latest features and capabilities for you to upgrade your factory radio. For more details, you can click:
This modern Mercedes-Benz SLK W171 R171 car radio is anti-shock and comes with built-in speakers. Its sound quality is quite high. Besides, you can simply pair with your compatible mobile phone with this unit for hands-free calls and music streaming. Just take it as your wonderful road companion!

Will bluetooth work with Samsung galaxy note 8?
Will all car speakers be connected?
Where to order from?
Is unit shipped to USA from overseas?
How much it costs in US $
yes, bluetooth will work with Samsung galaxy note 8 , and all car speakers will be connected , please visit seicane.com
All well & good if you have cables near the radio location. But what if your old radio has optical links on the back of the radio ?
I have a slk200 171 that has optical, where do i find the electrical connections in my car that would plug into the extension loon then to the radio ?
dear,
1.we will send all needed cables to you,it is plug and play.
2.we will send the decoder to work with your optical.
Could you please send us the photo of your car’s dashboard to sales@seicane.com?
And could you please tell us the model and year of your car?
Then we can help you check if this unit can fit your car or not ,hope you could cooperate with us.
Looking forward to hearing from you soon.
Thank you & Best regards!
Hoi John ik zit met hetzelfde probleem. Hoe heb jij het opgelost? bij mij is het nog niet gelukt. krijg geen radio contact en geluid. Weet jij een oplossing?
Dear,
so sorry for the inconvenience.
To give you a fast solution,we have asked our after sales staff to help you out.
their email address is: aftersales@seicane.com,you can contact them directly.
Have a good day!