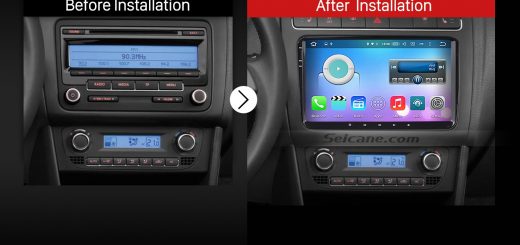
To have your new car stereo installed may cost you quite a lot of money. So can a car owner install it on their own? The answer is absolutely yes. If you have some related installation experience, you can easily finish the installation with the help of a step-by-step installation guide. Here I’d like to share a professional 2004-2011 VW Volkswagen Sagita car radio installation guide from Seicane. If you also have the same dashboard as the picture below, you can follow it to help with the installation of your new car stereo.

2004-2011 VW Volkswagen Sagita car radio after installation
Here are some tips about the installation:
1.Please disconnect the power before the installation.
2.Please prepare a lever and a screwdriver before the removal and the installation.
3.Please keep all the separate parts from the car. Please take great care of the dashboard to avoid scratching it during its detachment and installation. Please keep handy any parts from the car and make use of all the original screws from the car as much as possible. so each related part of the unit can be fixed securely.
4.For your convenience, here’s the recommended tools for removal and installation from Seicane, please check for more details: http://www.seicane.com/car-dvd-dismantling-device-srd-400
2004-2011 VW Volkswagen Sagita car radio installation guide
1.Remove the top panel with a lever.

Remove the top panel with a lever
2.Disconnect the connector at the back of the panel.

Disconnect the connector at the back of the panel
3.Unscrew the screw with a screwdriver.

Unscrew the screw with a screwdriver
4.Remove the metal sheet on the top with your hands.

Remove the metal sheet on the top with your hands
5.Unscrew two screws circled in red shown as follows under the metal sheet.

Unscrew two screws circled in red shown as follows under the metal sheet
6.Remove the air conditioner vent with your hands.

Remove the air conditioner vent with your hands
7.Unscrew two screws under the vent with a screwdriver.

Unscrew two screws under the vent with a screwdriver
8.Remove the panel on the original car radio.

Remove the panel on the original car radio
9.Unscrew four screws holding the original car radio with a screwdriver.

Unscrew four screws holding the original car radio with a screwdriver
10.Take the original car radio out of the dash.

Take the original car radio out of the dash
11.Disconnect all the connectors at the back of the original car radio.

Disconnect all the connectors at the back of the original car radio
12.Check all the accessories for the new Seicane car radio.

Check all the accessories for the new Seicane car radio
13.Connect the harnesses to the back of the new Seicane car radio.

Connect the harnesses to the back of the new Seicane car radio
14.Connect the Seicane car radio to your original car radio ‘s plugs.
15.Turn on the new Seicane car radio to have a careful check if everything works well. If it doesn’t, please check whether all the cables are connected correctly.
16.Put the new Seicane car radio into the dash.
17.Put everything into their original place.
Under the guidance of this step-by-step installation for the 2004-2011 VW Volkswagen Sagita car radio, can you finish the installation on your own? If not, you can consult your dealer for help. Or you can directly have it installed by a professional.
If you don’t find an ideal car radio for your car, I’d like to recommend a remarkable 2004-2011 VW Volkswagen Sagita car radio with the latest Android system from Seicane to you. You are welcome to check out for more details with the following link:
With an outstanding 8 inch HD touch screen as well as practical and entertainment features that include: 3D GPS, Bluetooth hands-free calling, iPod compatibility, a built-in DVD player, and music streaming straight from your phone, it’s without a doubt that this amazing VW Volkswagen Sagita car radio is your best choice for you to upgrade your factory radio.

Recent Comments