If you are not satisfied with your factory radio and would like to replace your factory radio with a brand new multifunctional car radio, you can browse some professional websites for a related correct installation guide. This article mainly introduce a 2009 2010 2011 2012 Mazda PREMACY car radio installation guide from Seicane. If you have the same or similar dashboard, you can refer to this guide carefully.
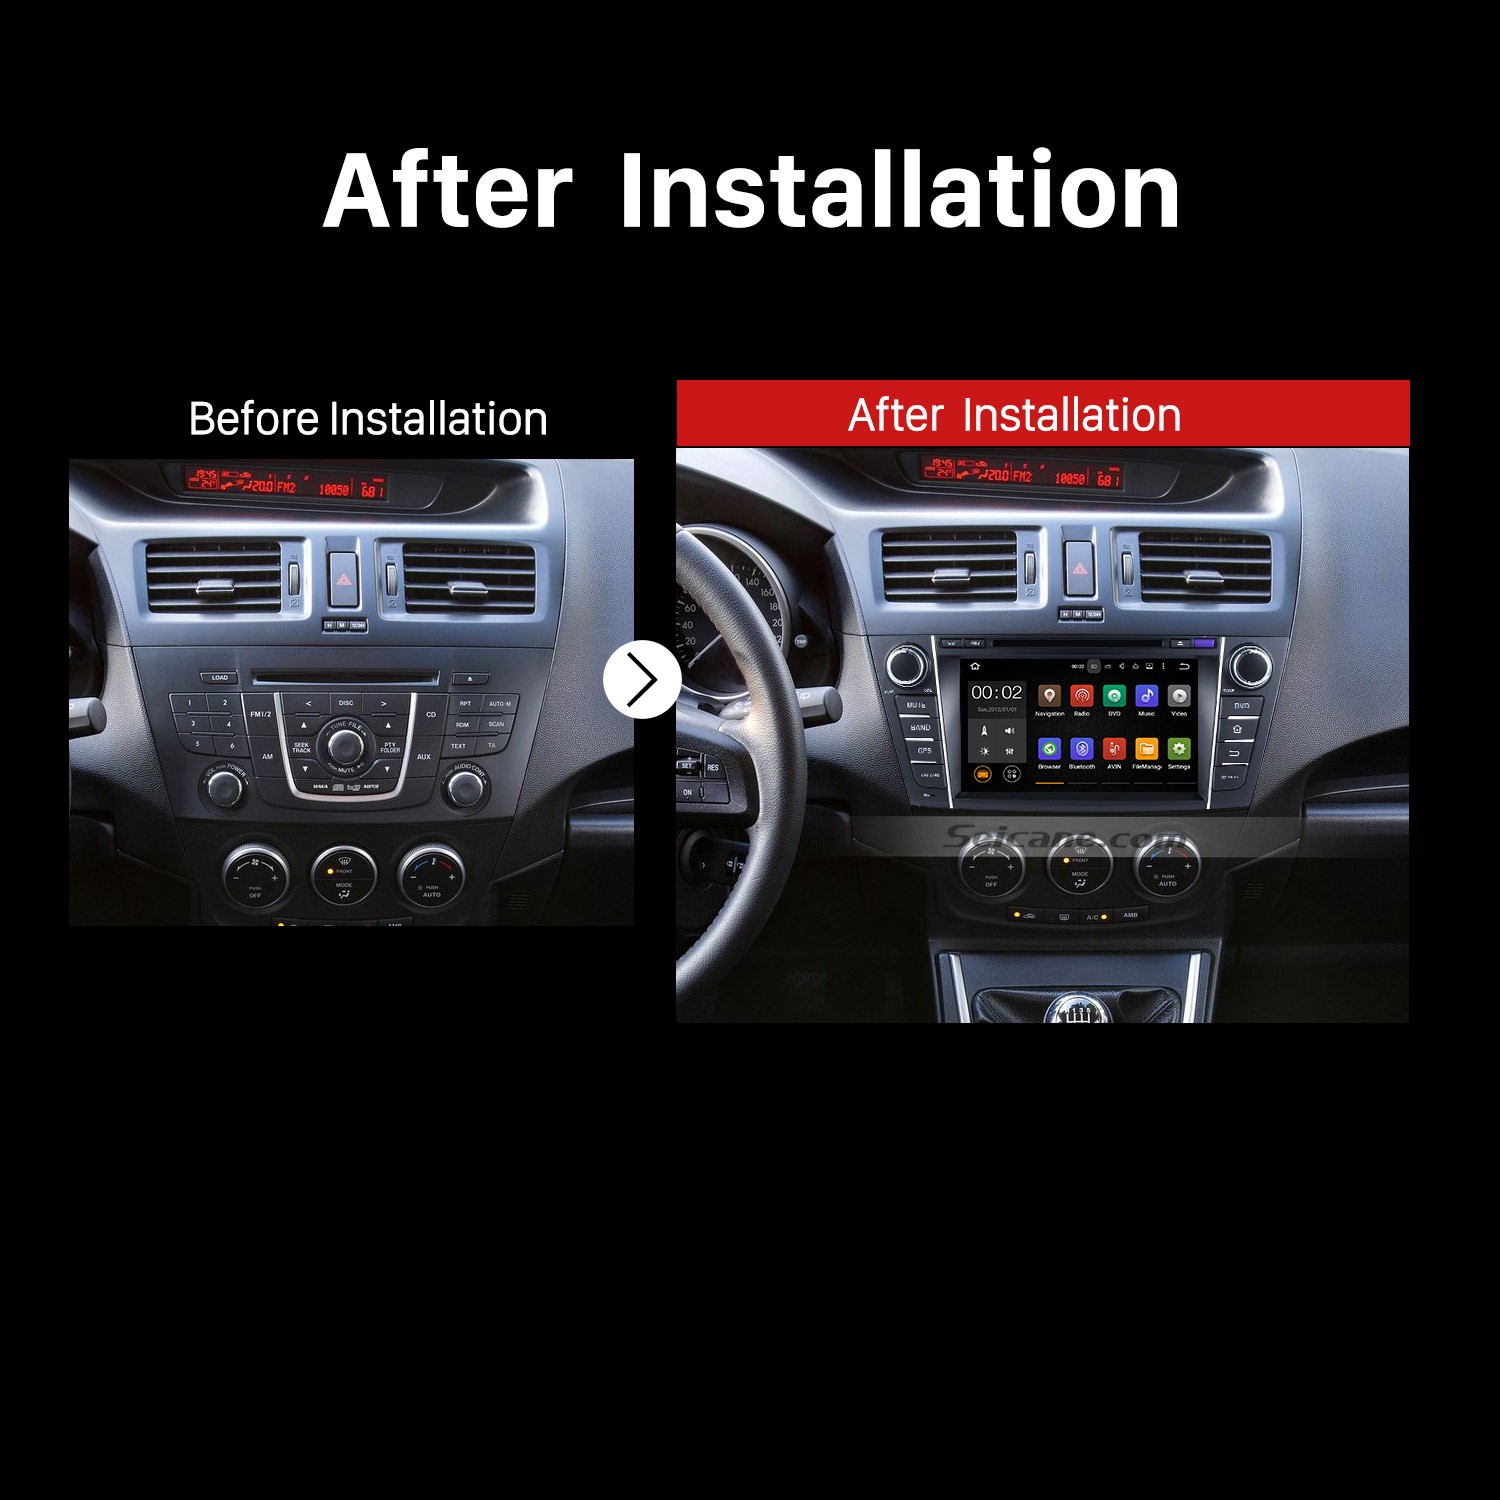
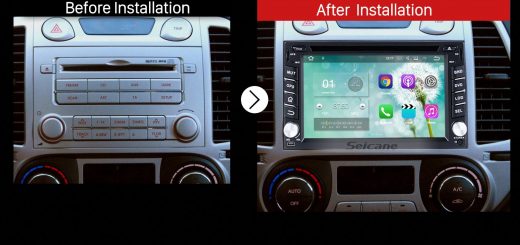
2009 2010 2011 2012 Mazda PREMACY Radio after installation
Before and during installation, you should notice:
1. Before connecting, please make sure the ignition is off to avoid short circuit.
2. Ensure connect the yellow and red power cable at last.
3. Ensure that all loose wires are isolated with electrical tape
4. Ensure don’t tangle the wire when tighten the moving parts(Such as seat rails).
5. Ensure that all ground is connected to the same place.
6. Using the improper fuse may cause damage of fire, so when replace the fuse, please consult the professional.
7. For your convenience, here’s the recommended tools for removal and installation from Seicane, please check for more details: http://www.seicane.com/car-dvd-dismantling-device-srd-400
2009 2010 2011 2012 Mazda PREMACY car radio installation guide
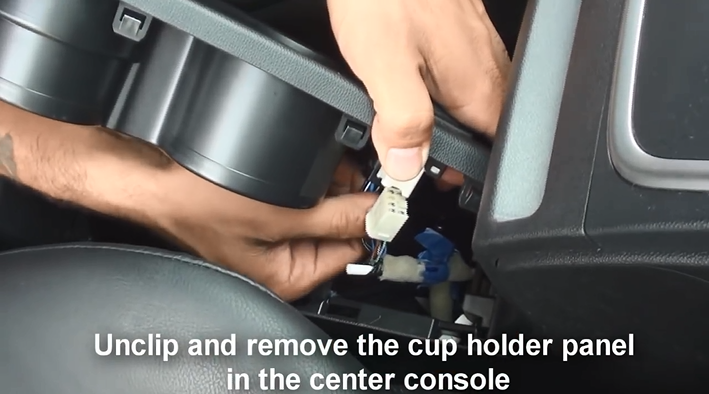
1. Unclip and remove the cup holder panel in the center console.
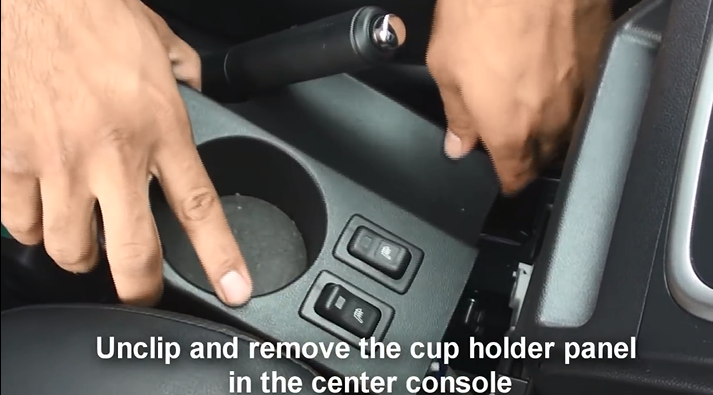
Unclip and remove the cup holder panel in the center console
1-1
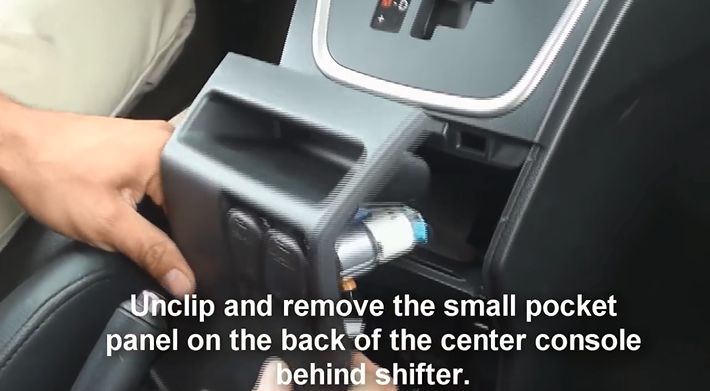
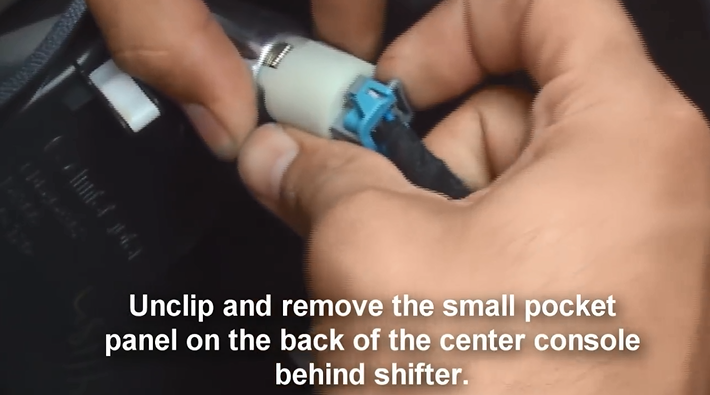
2. Unclip and remove the small pocket panel on the back of the center console behind shifter.
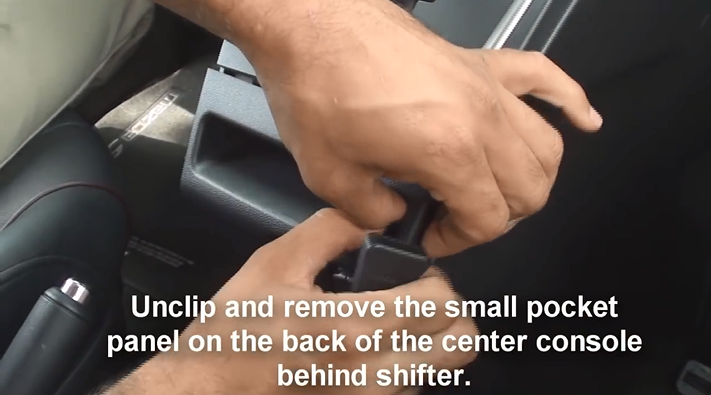
Unclip and remove the small pocket panel on the back of the center console behind shifter
2-1
2-2
3. Remove two 8mm bolts under the cup holder panel holding the back half of the center console to the front half.
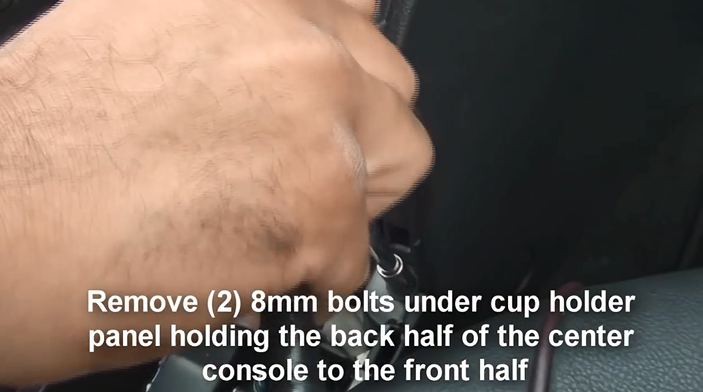
Remove two 8mm bolts under the cup holder panel holding the back half of the center console to the front half
4. Unscrew the shift knob and remove it carefully.
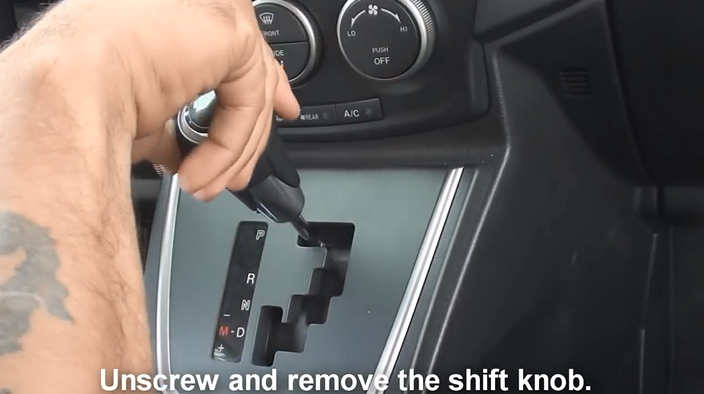
Unscrew the shift knob and remove it carefully
5. Unclip and remove the shifter trim panel.

Unclip and remove the shifter trim panel
6. Slide both seats forwards and remove two Phillips screws on each side of the center console under the screw covers.
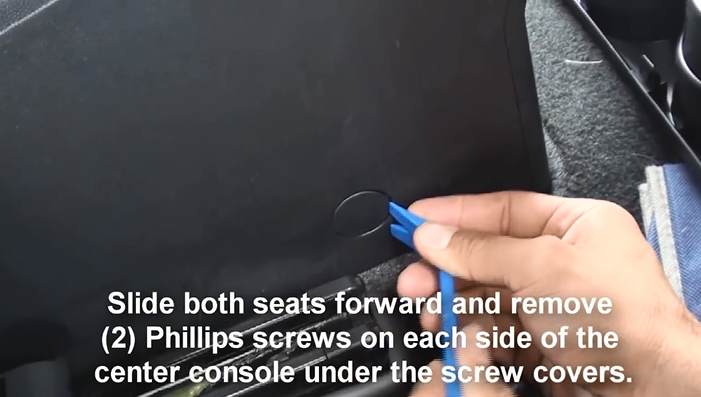
Slide both seats forwards and remove two Phillips screws on each side of the center console under the screw covers
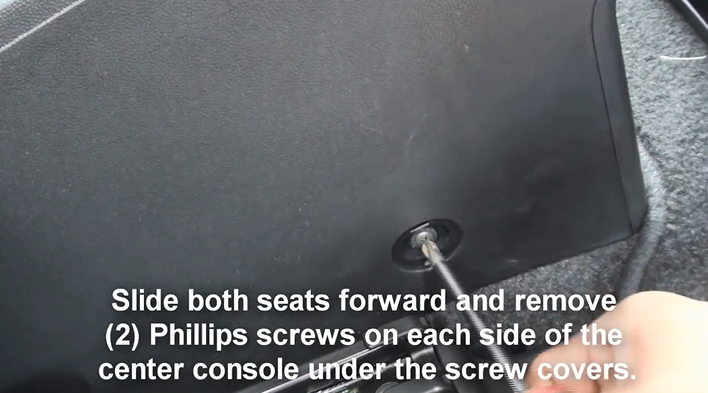
6-1
7. Unclip and pull back the panels at the lower front sides of the center console.
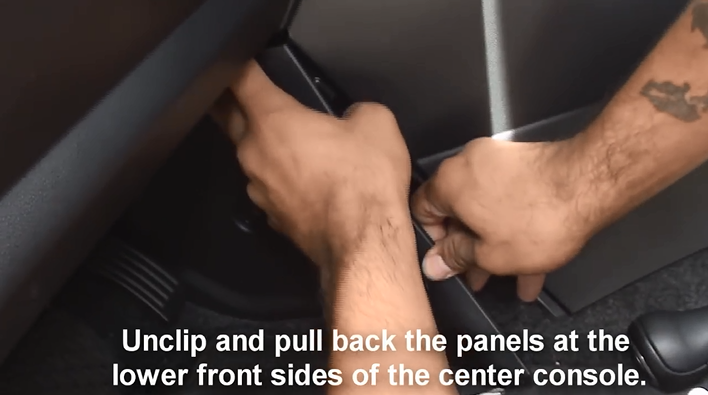
Unclip and pull back the panels at the lower front sides of the center console
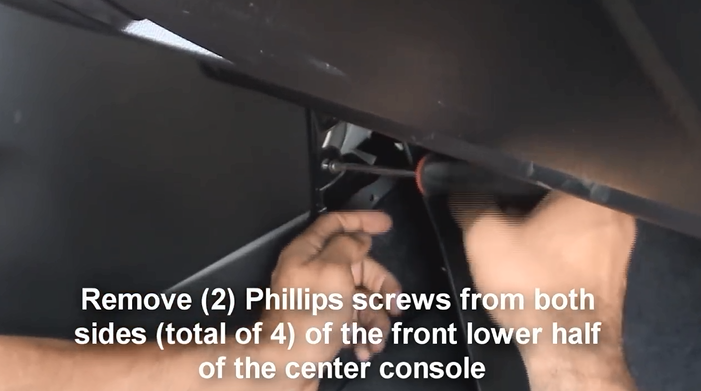
8. Remove two Phillips screws from both sides(total of four) of the front lower half of the center console.
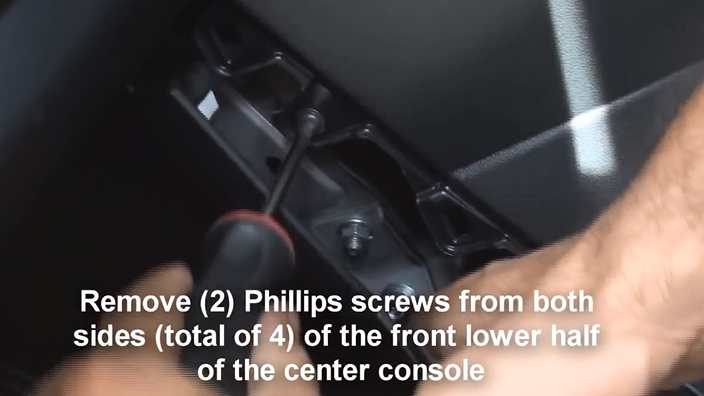
Remove two Phillips screws from both sides(total of four) of the front lower half of the center console
8-1
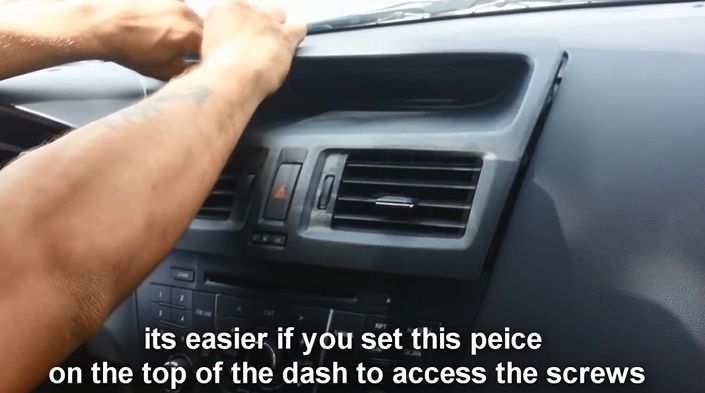
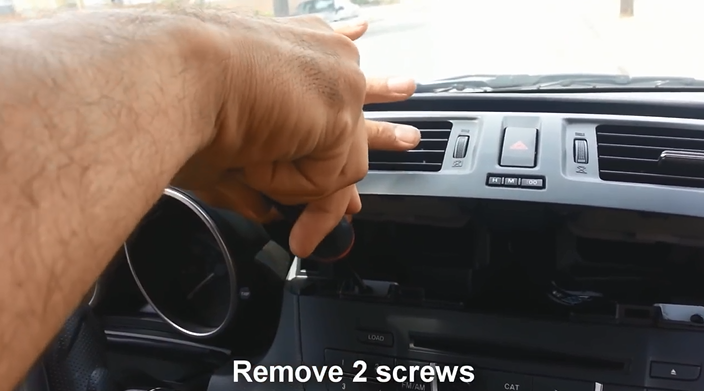
9. Unclip and remove the vent panel including the hazard switch above the factory radio. Then it will be much easier for you to get access to the screws. And remove the two screws.
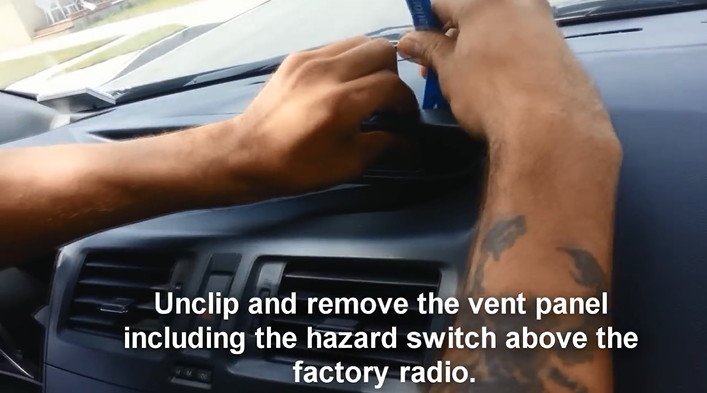
Unclip and remove the vent panel including the hazard switch above the factory radio. Then it will be much easier for you to get access to the screws. And remove the two screws
9-1
9-2
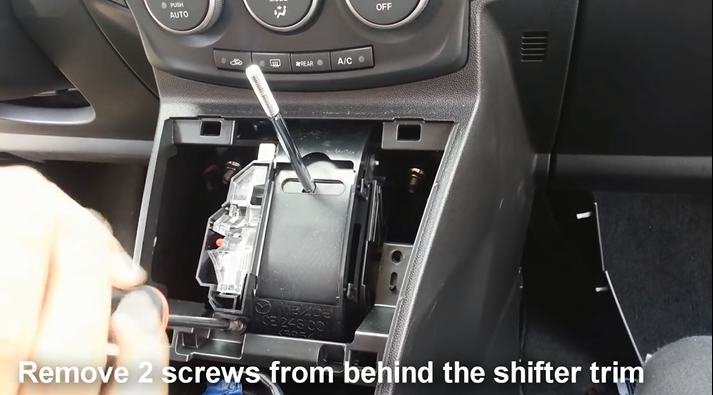
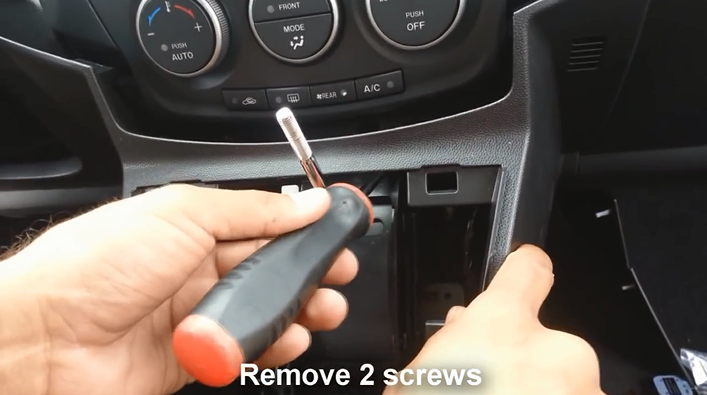
10. Remove two screws from behind the shifter trim.

Remove two screws from behind the shifter trim
10-1
11. Pull center console forward so as to gain access to two screws under the climate controls. And then remove these two screws.
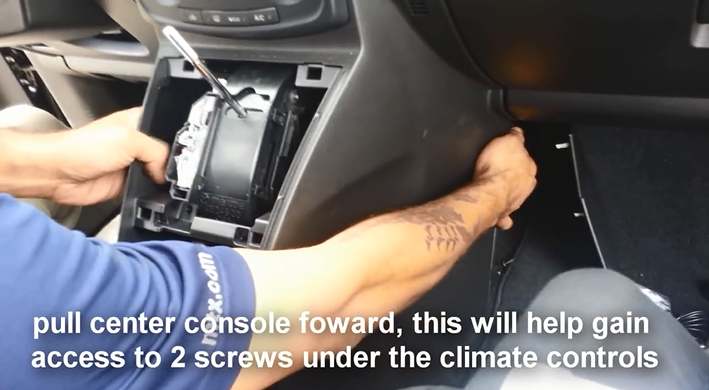
Pull center console forward so as to gain access to two screws under the climate controls. And then remove these two screws
11-1
12. Unclip harness and pull rear center console backwards.
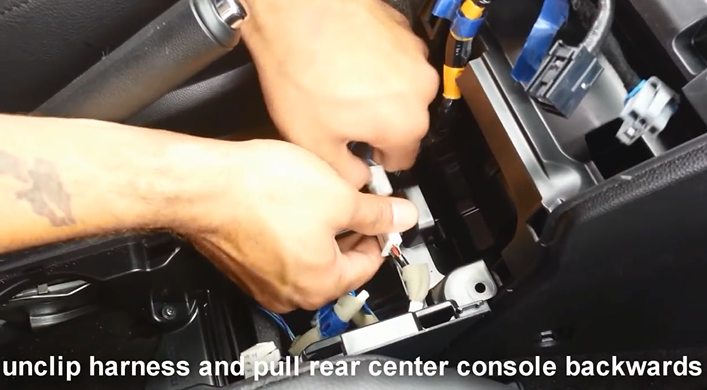
Unclip harness and pull rear center console backwards
13. Press in shifter to release trigger and pull shifter down, make sure to have a brake on.
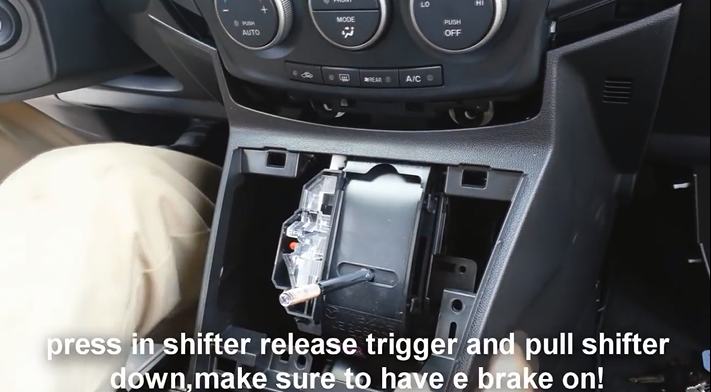
Press in shifter to release trigger and pull shifter down, make sure to have a brake on
14. Use a pry tool to release climate controls.
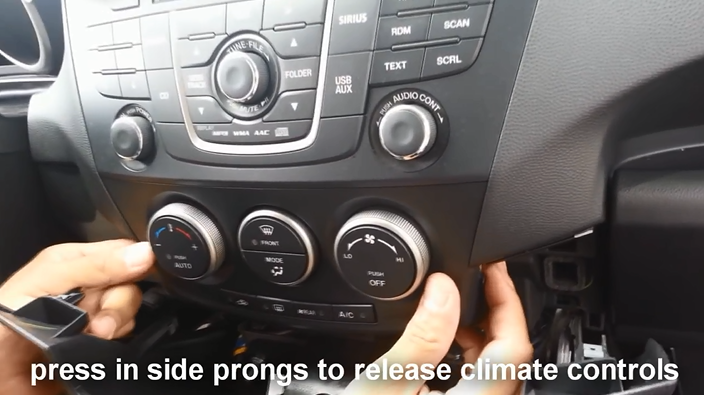
Use a pry tool to release climate controls
15. Remove one screw and one 10mm bolt.
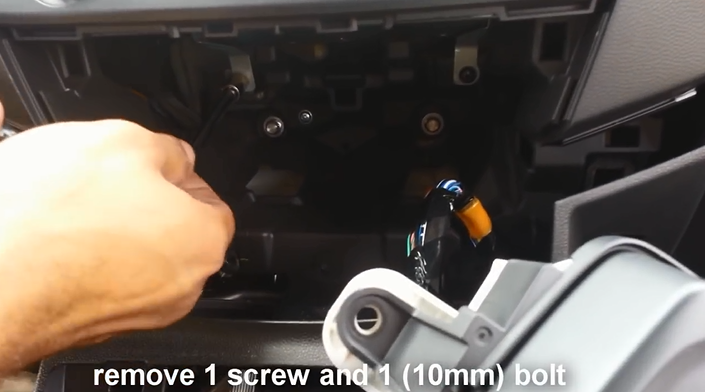
Remove one screw and one 10mm bolt
16. Pull factory radio out, release clips and unplug radio connectors.

Pull factory radio out, release clips and unplug radio connectors
17. Check all the accessories for the new Seicane car radio.
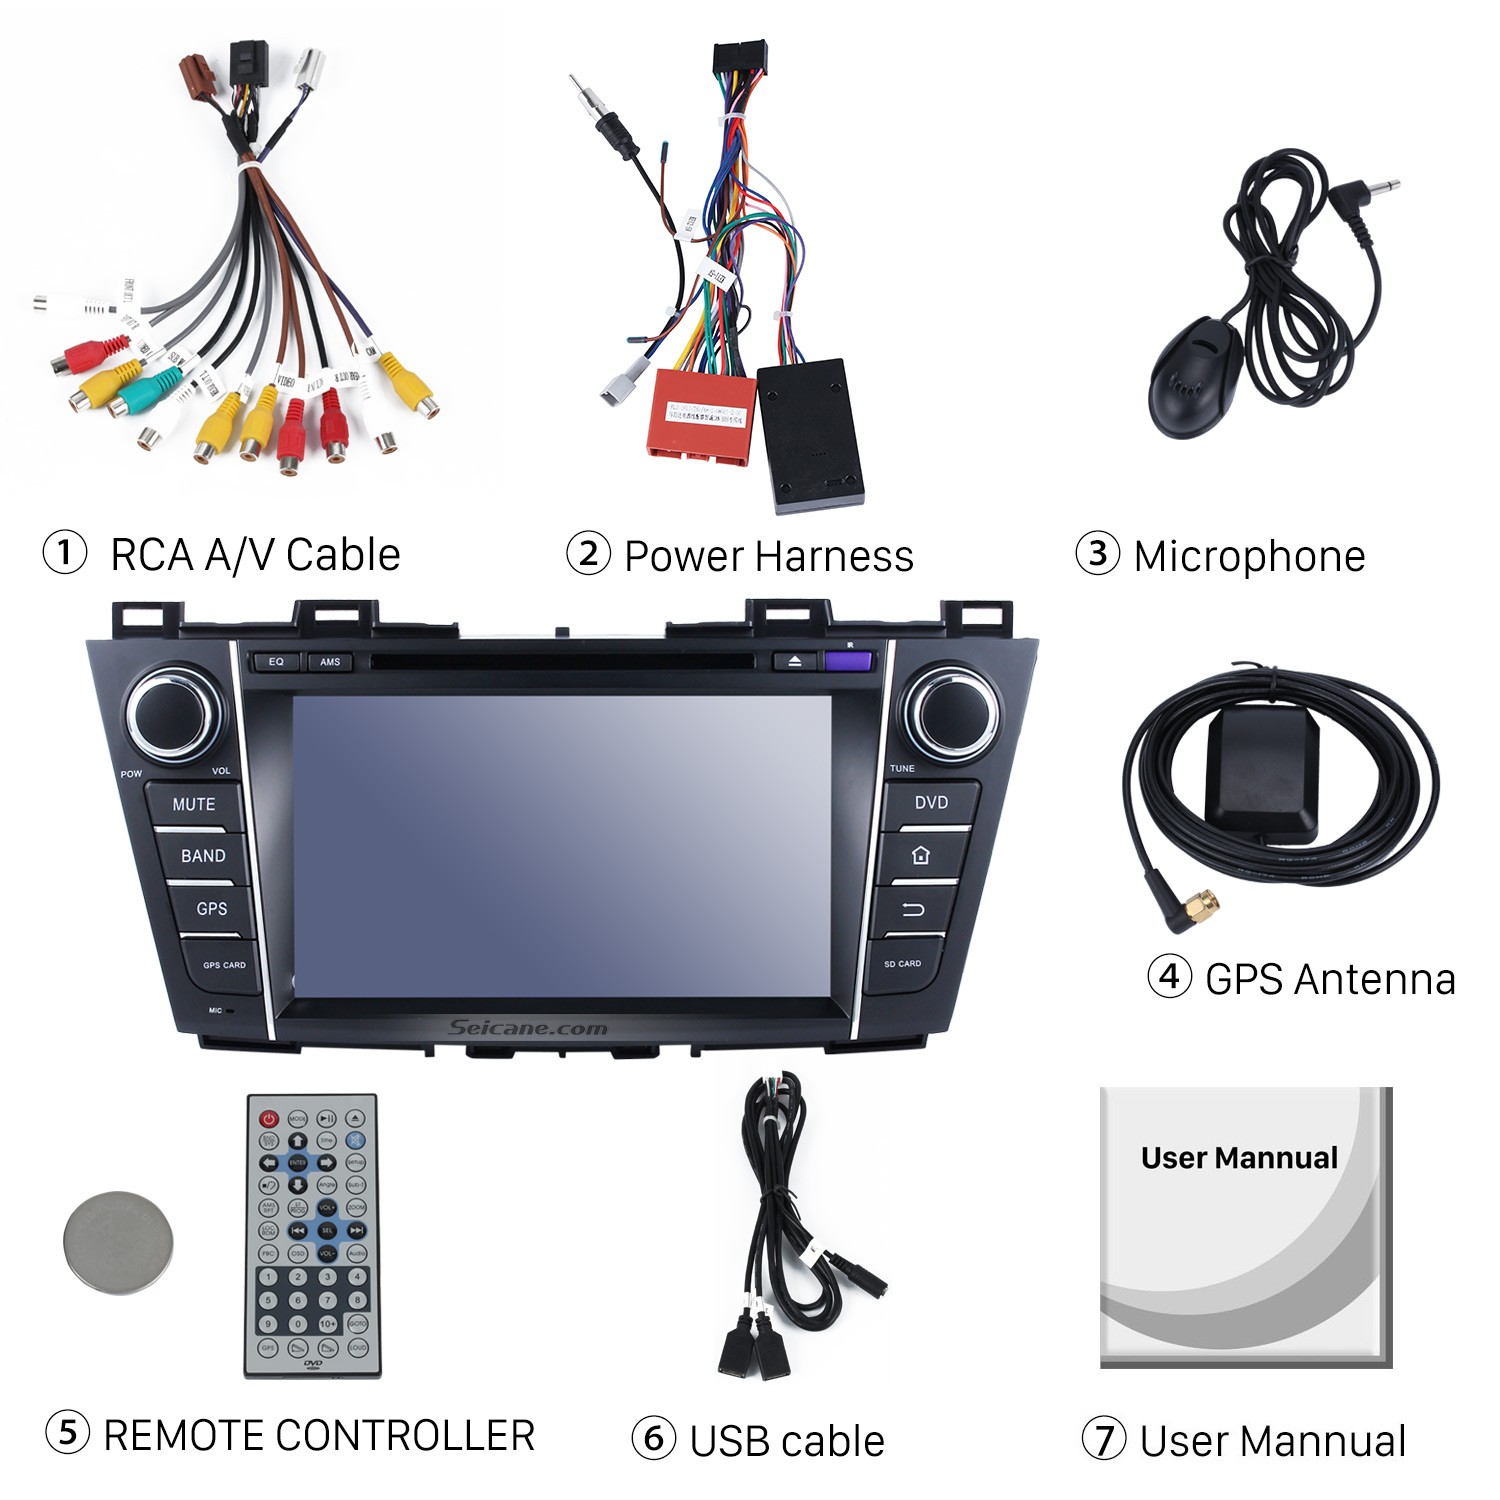
Check all the accessories for the new Seicane car radio
18. Connect the harnesses to the back of the new Seicane car radio.
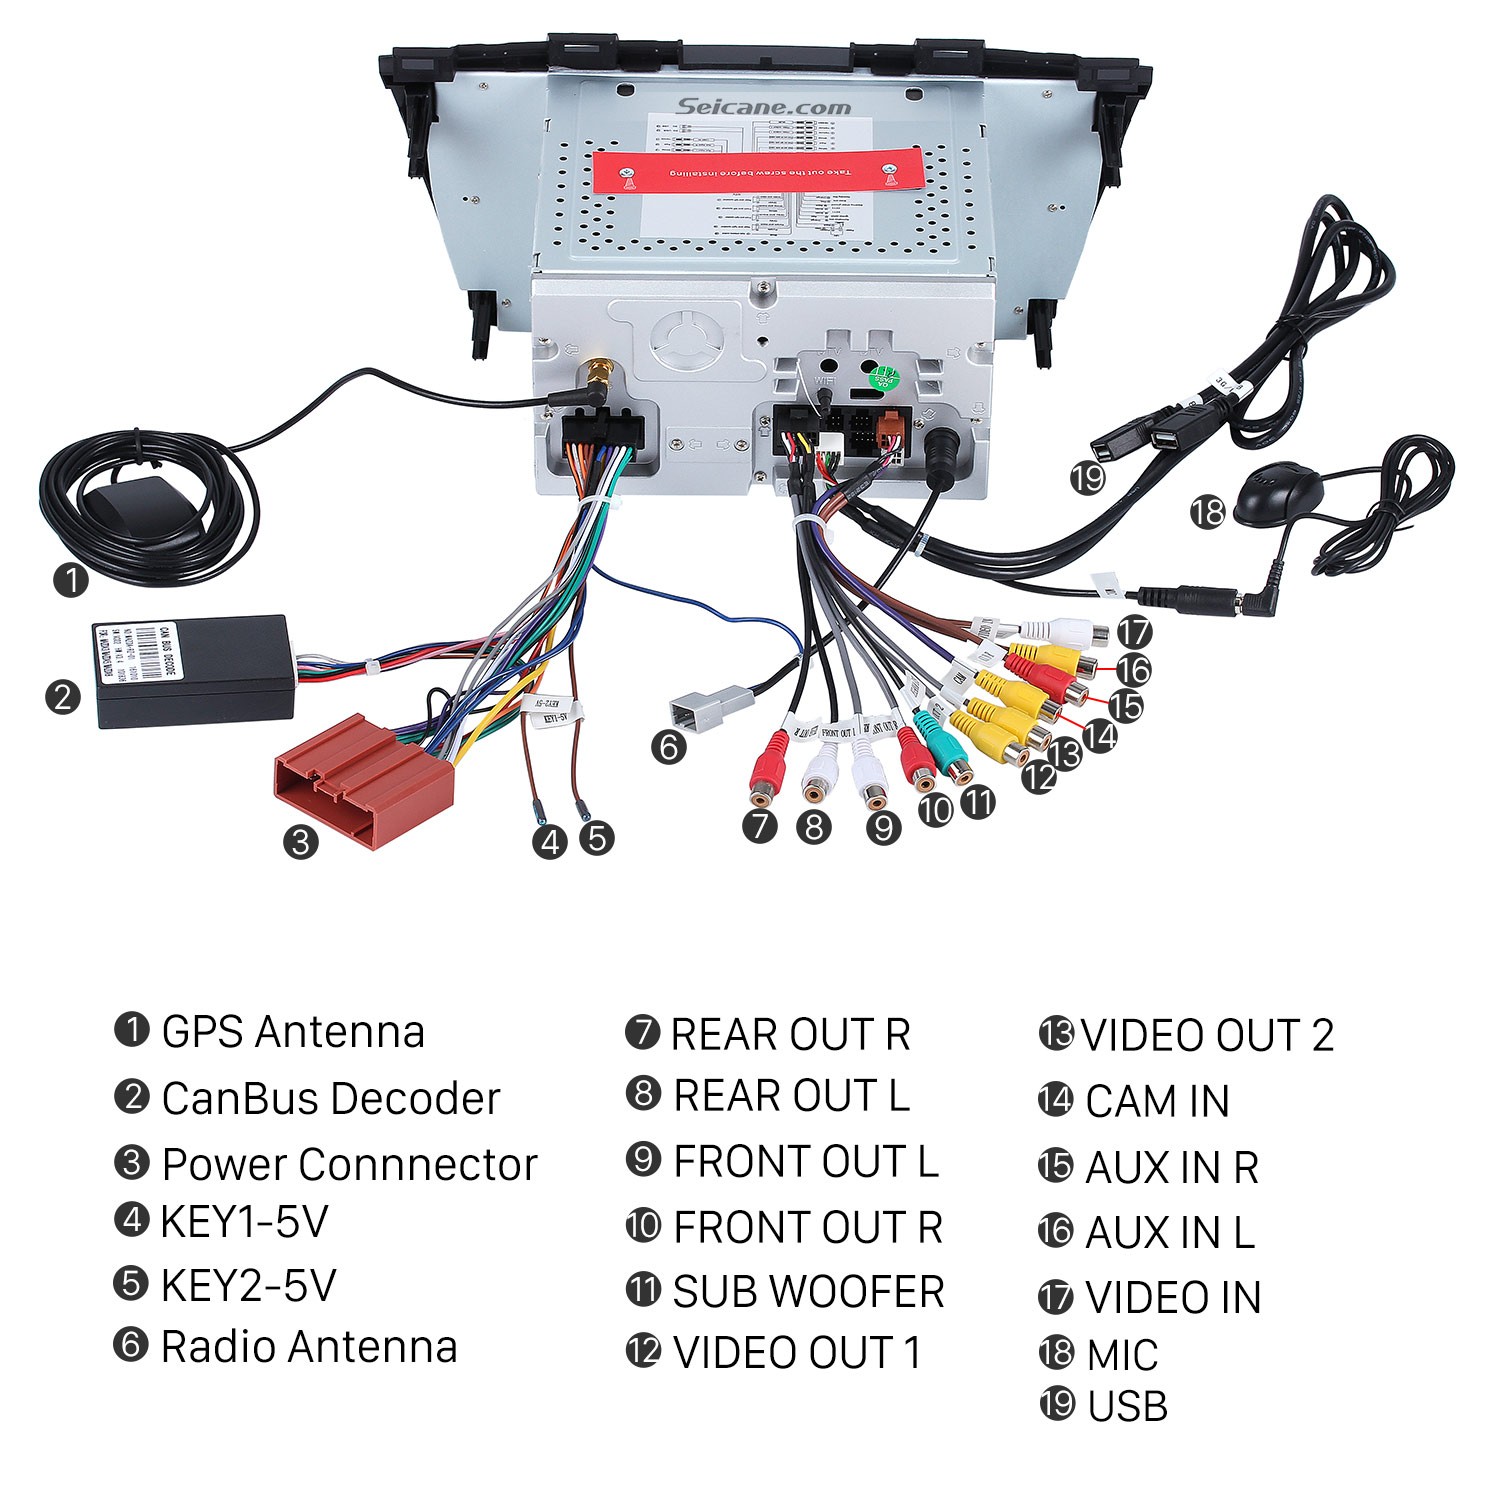
Connect the harnesses to the back of the new Seicane car radio
19. Connect the Seicane car radio to your original car radio ‘s plugs.
20. Turn on the new Seicane radio to have a careful check if everything works well. If it doesn’t, please check whether all the cables are connected correctly.
21. Put the new Seicane radio into the dash.
22. Put everything into their original place. All the installation is done.
That’s all about how to remove and install a 2009 2010 2011 2012 Mazda PREMACY car radio. To solve the problems you meet during the installation, you can seek help from your dealer, someone experienced or a professional. Or if you are afraid of making damage to either your car radio or your car, you can directly arrange a professional technician to help you install the new car radio.
To help you select an ideal car radio, here I would like to share a remarkable 2009 2010 2011 2012 Mazda PREMACY car radio from Seicane with you. For more details, please click:
This car radio is running on the pure and stable Android 7.1 operation system, a powerful quad-core CPU processor and 2GB RAM, so it can provide you with a much smoother and more stable operation experience.
Thanks to the high-precise GPS navigation system with turn-by-turn directions and voice prompts, you are able to locate where you are currently and find the right way to reach any locations you would like to go to even you are travelling around an unfamiliar place. Besides, this car radio comes with dual zone function, which enables you to listen to your favorite music while navigating.
What’s more, this car radio has built-in Bluetooth module, so you can pair your Bluetooth-enabled mobile phone with this car radio so as to help you get access to both Bluetooth hands-free phone calls as well as Bluetooth streaming music without taking your hands off the steering wheel.
Wish you like this unit and good luck to you.

Recent Comments